Add SSO to Uptime Kuma with AWS ALB and Entra ID
Uptime Kuma does not provide native SSO. This article shows how to use AWS Application Load Balancer OIDC authentication with Microsoft Entra ID to centralize access to your monitoring entry point.
What Is Uptime Kuma?
Uptime Kuma is a popular free and open-source self-hosted monitoring tool. It is commonly used to monitor the availability of websites, servers, APIs, and service endpoints.
It has two major strengths.
First, it supports a wide range of monitor types. In addition to common checks such as Ping and HTTP(s), it can also monitor databases, DNS, certificate status, and more.
Second, it has rich notification integrations. It supports services such as Telegram, Slack, Discord, and Teams, which makes it very useful for small teams and personal operations.
Deployment is lightweight as well. The simplest approach is to run it with Docker. If you want something closer to a production setup, you can also install Node.js on a VM, manage the service with PM2, and replace the default SQLite database with MySQL or MariaDB.
Why SSO Needs Extra Handling
Uptime Kuma currently does not provide native Single Sign-On (SSO), and its account management is designed more for internal use within a single Uptime Kuma instance.
If you want to delegate login control to an existing identity system, a common approach is to place an authentication proxy in front of it, such as Authelia or authentik.
However, if your environment is already running on AWS and your company uses Microsoft Entra ID as the identity provider, you do not necessarily need to maintain another SSO component. You can use the OIDC authentication feature of AWS Application Load Balancer (ALB), so ALB completes authentication before traffic reaches Uptime Kuma.
In other words, Uptime Kuma itself does not need to understand OIDC or implement SSO. It only needs to sit behind ALB, while authentication is handled by ALB and Entra ID.
Architecture
The overall architecture looks like this:
flowchart LR
  A[User] --> B[AWS Application Load Balancer]
  B --> C[Microsoft Entra ID / App Registration]
  C --> B
  B --> D[Uptime Kuma]
The flow can be broken down into the following steps:
- The user opens the Uptime Kuma domain.
- ALB detects that the user is not authenticated and redirects the user to Entra ID.
- After Entra ID completes authentication, the user returns to the ALB OIDC callback endpoint.
- ALB creates a login session and forwards the request to the Uptime Kuma backend.
Prerequisites
This article assumes that Uptime Kuma is already deployed and reachable through an internal endpoint or target group.
The deployment method does not matter. For example, it can be:
- Uptime Kuma running in Docker on EC2
- Uptime Kuma running on EC2 with Node.js and PM2
- Uptime Kuma deployed to Kubernetes with a Deployment or Helm
The important point is that Uptime Kuma must sit behind ALB, and the official external entry point should only go through ALB.
After disabling Uptime Kuma’s built-in authentication, the backend service should not be exposed directly to the Internet. Use Security Groups, NACLs, or Ingress rules so that only ALB can reach Uptime Kuma.
Disable Uptime Kuma Built-In Authentication
After signing in to Uptime Kuma, go to Settings -> Security, find Disable Auth, and run it.
The reason for this step is that authentication will be handled by ALB and Entra ID afterward. If Uptime Kuma keeps its own login page enabled, users will first authenticate with Entra ID and then be asked to sign in to Uptime Kuma again, which creates a double-login experience.
Create the ALB
Because the Entra ID App Registration needs a redirect URI, it is better to create the ALB and the public domain first.
At the beginning, the ALB listener can be configured like this:
- Use HTTPS on the
443listener - Attach an ACM certificate
- Forward the default action to the Uptime Kuma target group for now
After confirming that the domain can reach Uptime Kuma, come back and add OIDC authentication to the listener.
Create the Entra ID App Registration
In the Azure portal, go to App registrations and create a new app registration.
Recommended settings:
- Name: for example,
uptime-kuma - Supported account types: single tenant
- Redirect URI: select
Web - Redirect URI URL: enter
https://your-domain/oauth2/idpresponse
After the app registration is created, record the Application (client) ID. You will use it later when configuring ALB.
Next, go to Certificates & secrets, create a client secret, and record the secret value. This value is shown only once, and it will also be used in the ALB OIDC settings.
If you want only specific users or groups to access Uptime Kuma, find this application under Enterprise applications and configure:
Properties-> setAssignment required?toYesUsers and groups->Add user/groupto add the users or groups that should be allowed to use Uptime Kuma
If you test with an Azure administrator account, you may not clearly see the effect of
Assignment required?because of elevated permissions. Use a regular user account for testing to confirm that users who are not assigned cannot sign in.
Modify the ALB Listener
After the App Registration is ready, return to ALB and add OIDC authentication.
There are three common setup paths. Choose the one that matches how your environment is managed:
- Manage the ALB listener with Terraform
- Use Kubernetes Ingress with AWS Load Balancer Controller
- Configure it manually in the AWS Console GUI
You do not need to configure all three. If ALB is managed by Terraform, use the Terraform path. If ALB is created from Kubernetes Ingress, use Ingress annotations. If it is maintained manually, use the AWS Console path.
Shared OIDC Information
Whichever path you choose, you will need the following OIDC values. Replace <tenant-id> with your Entra ID tenant ID.
| Field | Value |
|---|---|
| Issuer | https://login.microsoftonline.com/<tenant-id>/v2.0 |
| Authorization endpoint | https://login.microsoftonline.com/<tenant-id>/oauth2/v2.0/authorize |
| Token endpoint | https://login.microsoftonline.com/<tenant-id>/oauth2/v2.0/token |
| User info endpoint | https://graph.microsoft.com/oidc/userinfo |
| Client ID | Application (client) ID from the App Registration |
| Client secret | Client secret value from the App Registration |
| Scope | openid email profile |
Option 1: Terraform
If the ALB listener is managed by Terraform, add two default_action blocks to aws_lb_listener.
The first action handles authenticate-oidc, and the second action forwards authenticated traffic to the Uptime Kuma target group.
1
2
3
4
5
6
7
8
9
10
11
12
13
14
15
16
17
18
19
20
21
22
23
24
25
26
27
28
29
30
31
32
33
34
resource "aws_lb_listener" "uptime_kuma_port443" {
  load_balancer_arn = aws_lb.uptime_kuma.arn
  port              = "443"
  protocol          = "HTTPS"
  ssl_policy        = "ELBSecurityPolicy-TLS-1-2-2017-01"
  certificate_arn   = data.aws_acm_certificate.moxa.arn

  default_action {
    type  = "authenticate-oidc"
    order = 1

    authenticate_oidc {
      issuer = "https://login.microsoftonline.com/${var.entra_tenant_id}/v2.0"

      authorization_endpoint = "https://login.microsoftonline.com/${var.entra_tenant_id}/oauth2/v2.0/authorize"
      token_endpoint         = "https://login.microsoftonline.com/${var.entra_tenant_id}/oauth2/v2.0/token"
      user_info_endpoint     = "https://graph.microsoft.com/oidc/userinfo"

      client_id     = var.entra_client_id
      client_secret = var.entra_client_secret

      scope                      = "openid email profile"
      session_cookie_name        = "uptime_kuma_auth"
      session_timeout            = 3600
      on_unauthenticated_request = "authenticate"
    }
  }

  default_action {
    type             = "forward"
    order            = 2
    target_group_arn = aws_lb_target_group.uptime_kuma.arn
  }
}
Replace the following Terraform values:
| Variable | Description |
|---|---|
var.entra_tenant_id | Entra ID tenant ID |
var.entra_client_id | Application (client) ID from the App Registration |
var.entra_client_secret | Client secret value from the App Registration |
data.aws_acm_certificate.moxa.arn | ACM certificate ARN |
aws_lb_target_group.uptime_kuma.arn | Target group ARN for Uptime Kuma |
Option 2: Kubernetes Ingress YAML
If Uptime Kuma is deployed on Kubernetes and ALB is created by AWS Load Balancer Controller, you can configure OIDC authentication directly through Ingress annotations.
Store the OIDC clientID and clientSecret in a Kubernetes Secret instead of writing them directly in the Ingress annotation.
1
2
3
4
5
6
7
8
9
apiVersion: v1
kind: Secret
metadata:
  namespace: <NAMESPACE>
  name: <OIDC_SECRET_NAME>
type: Opaque
stringData:
  clientID: "<ENTRA_APPLICATION_CLIENT_ID>"
  clientSecret: "<ENTRA_CLIENT_SECRET>"
Then reference this Secret from alb.ingress.kubernetes.io/auth-idp-oidc in the Ingress.
1
2
3
4
5
6
7
8
9
10
11
12
13
14
15
16
17
18
19
20
21
22
23
24
25
26
27
28
29
30
31
32
33
34
35
36
37
38
39
40
41
apiVersion: networking.k8s.io/v1
kind: Ingress
metadata:
  namespace: <NAMESPACE>
  name: <INGRESS_NAME>
  annotations:
    alb.ingress.kubernetes.io/scheme: internal
    alb.ingress.kubernetes.io/subnets: <SUBNET_ID_1>,<SUBNET_ID_2>
    alb.ingress.kubernetes.io/healthcheck-path: "<HEALTHCHECK_PATH>"
    alb.ingress.kubernetes.io/listen-ports: '[{"HTTPS": 443, "HTTP": 80}]'
    alb.ingress.kubernetes.io/certificate-arn: <ACM_CERTIFICATE_ARN>
    alb.ingress.kubernetes.io/auth-type: oidc
    alb.ingress.kubernetes.io/auth-scope: openid email profile
    alb.ingress.kubernetes.io/auth-session-cookie: <AUTH_SESSION_COOKIE_NAME>
    alb.ingress.kubernetes.io/auth-session-timeout: "3600"
    alb.ingress.kubernetes.io/auth-on-unauthenticated-request: authenticate
    alb.ingress.kubernetes.io/auth-idp-oidc: >
      {
        "issuer": "<OIDC_ISSUER>",
        "authorizationEndpoint": "<OIDC_AUTHORIZATION_ENDPOINT>",
        "tokenEndpoint": "<OIDC_TOKEN_ENDPOINT>",
        "userInfoEndpoint": "<OIDC_USER_INFO_ENDPOINT>",
        "secretName": "<OIDC_SECRET_NAME>"
      }
    alb.ingress.kubernetes.io/ssl-redirect: "443"
    alb.ingress.kubernetes.io/load-balancer-attributes: idle_timeout.timeout_seconds=120
    alb.ingress.kubernetes.io/tags: Foo=Bar
  labels:
    app: <APP_LABEL>
spec:
  ingressClassName: alb
  rules:
    - http:
        paths:
          - path: /
            pathType: Prefix
            backend:
              service:
                name: <SERVICE_NAME>
                port:
                  number: <SERVICE_PORT>
Replace the following placeholders:
| Placeholder | Description |
|---|---|
<NAMESPACE> | Namespace where Uptime Kuma is deployed |
<INGRESS_NAME> | Ingress name |
<SUBNET_ID_1>,<SUBNET_ID_2> | Subnets used by ALB |
<ACM_CERTIFICATE_ARN> | ACM certificate ARN |
<OIDC_SECRET_NAME> | Kubernetes Secret name that stores the Entra ID client ID and client secret |
<ENTRA_APPLICATION_CLIENT_ID> | Application (client) ID from the App Registration |
<ENTRA_CLIENT_SECRET> | Client secret value from the App Registration |
<OIDC_ISSUER> | https://login.microsoftonline.com/<tenant-id>/v2.0 |
<OIDC_AUTHORIZATION_ENDPOINT> | https://login.microsoftonline.com/<tenant-id>/oauth2/v2.0/authorize |
<OIDC_TOKEN_ENDPOINT> | https://login.microsoftonline.com/<tenant-id>/oauth2/v2.0/token |
<OIDC_USER_INFO_ENDPOINT> | https://graph.microsoft.com/oidc/userinfo |
<SERVICE_NAME> | Uptime Kuma Service name |
<SERVICE_PORT> | Uptime Kuma Service port |
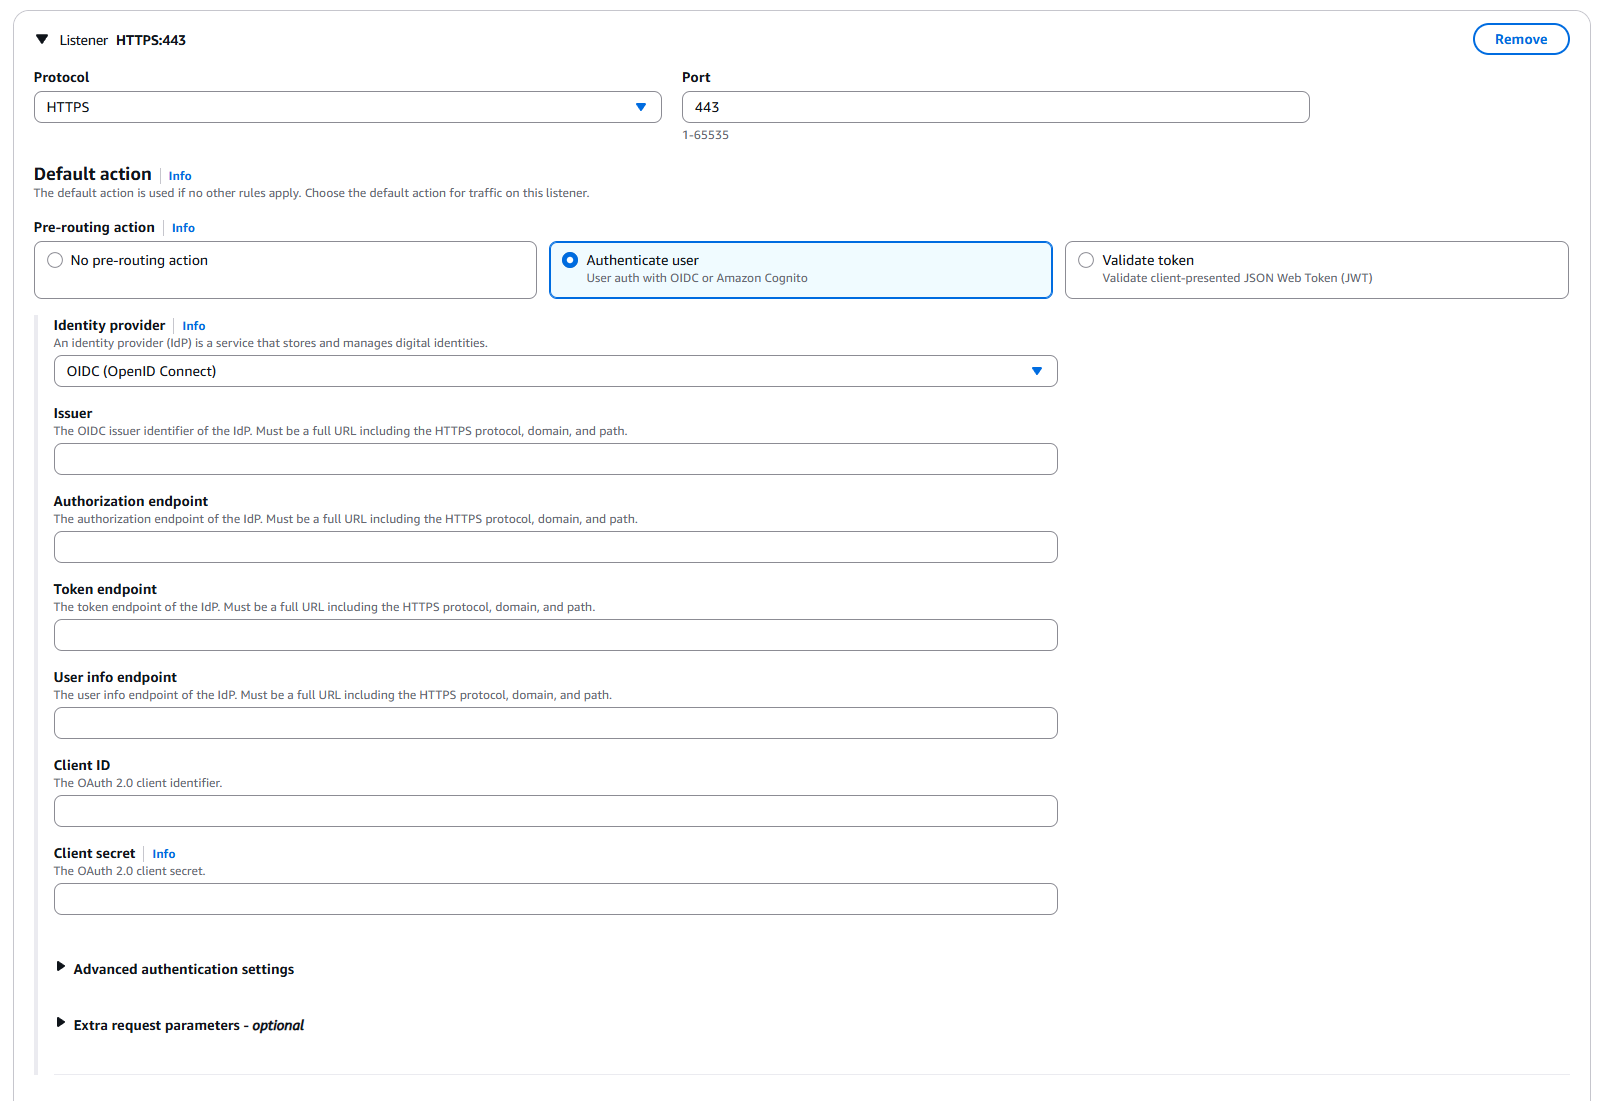
Option 3: AWS Console GUI
If you prefer configuring it in the AWS Console, add an authentication action to the ALB listener rule.
The recommended action order is:
| Order | Action | Description |
|---|---|---|
| 1 | Authenticate | Redirect users to Entra ID with OIDC |
| 2 | Forward | Forward authenticated traffic to the Uptime Kuma target group |
Fill in the OIDC fields as follows:
| AWS Console field | Value |
|---|---|
| Issuer | https://login.microsoftonline.com/<tenant-id>/v2.0 |
| Authorization endpoint | https://login.microsoftonline.com/<tenant-id>/oauth2/v2.0/authorize |
| Token endpoint | https://login.microsoftonline.com/<tenant-id>/oauth2/v2.0/token |
| User info endpoint | https://graph.microsoft.com/oidc/userinfo |
| Client ID | Application (client) ID from the App Registration |
| Client secret | Client secret value from the App Registration |
| Scope | openid email profile |
| Session cookie name | uptime_kuma_auth |
| On unauthenticated request | Authenticate |
After the configuration is complete, open the Uptime Kuma domain again. Under normal conditions, you should first be redirected to the Microsoft sign-in page. After signing in successfully, you will enter the Uptime Kuma interface.
Summary
Although Uptime Kuma does not provide native SSO, if it is deployed on AWS, ALB OIDC authentication can add that missing layer.
Uptime Kuma is only one example. As Vibe Coding becomes more common, many internal systems are built quickly and may not have a complete account, permission, or tenant model at the beginning. In that situation, you can place the system behind ALB and use the ALB Authenticate action with Entra ID or Amazon Cognito, so users are authenticated before they enter the application.
If the system later needs tenant creation, an admin backend, or more fine-grained authorization, you can still let ALB handle entry-point authentication first while the application focuses on its own business logic. The benefit of this approach is that you do not need to maintain an extra authentication service such as Authelia or authentik, while still reusing users, groups, and sign-in policies already managed in Entra ID or Cognito.
One important point: after disabling Uptime Kuma’s built-in authentication, or after putting an application without built-in authentication behind ALB, ALB becomes the real security boundary. Make sure the backend service can only be accessed by ALB, so users cannot bypass ALB and reach the system directly.